Where to start
Good again, this time we are going to make the following post about Proxmox and Ceph from 0 to 100, by chapters, because it is very extensive. Also indicate that before using this for a productive system, do not stay only in the GUI, research and learn about Debian, Proxmox console, storage, networking or everything will be very nice until you have an incident. As I comment it will be from 0 to 100, well the most basic, basic, like installing for example VirtualBox we skip it, but if I will explain the creation of the machines that we need, the one that does not need it that skips it except for the last part, maybe you do not know it and you find this error.

For this lab we will need at least a computer with 8GB and 8 cores or a dedicated server that is economical, since we are going to mount 3 nodes using nested virtualization and ceph, which needs 1-1.5GB RAM per TB. I am going to go out on a limb and install it on a laptop with 8GB and 4 cores and see if it is possible or it blows up and I have to start from scratch on a dedicated server. There will be steps that if you use a dedicated server you won’t have to do, as we will be using VirtualBox.
Only for those who are going to use a dedicated server will indicate that they will have to activate nested, where you can install a Proxmox and within that Proxmox 3 smaller Proxmox to be able to do the lab without having to purchase 3 dedicated.
Once you install the Proxmox Father so to speak if you have it:
Intel
echo “options kvm-intel nested=Y” > /etc/modprobe.d/kvm-intel.conf
modprobe -r kvm_intel
modprobe kvm_intel
AMD
echo “options kvm-amd nested=1” > /etc/modprobe.d/kvm-amd.conf
modprobe -r kvm_amd
modprobe kvm_amd
And reboot to see that there are no problems, once rebooted you can check with
cat /sys/module/kvm_intel/parameters/nested
Where a “Y” should appear. Having checked this you only have to create three new machines for the three nodes of the laboratory establishing in the type of CPU “host”, in AMD it is possible that you have to play with the flags that Proxmox offers us.
Now let’s start with VirtualBox which is what we will use in these posts. The first thing is to download version 6.1 to allow us to do nested virtualization. Once we have VirtualBox installed we will go to the official website of Proxmox to download the ISO of the latest version.
We create our first machine by clicking on New, where we will be asked for Name, Machine Folder System Type and the version

Memory size, minimum 2GB or Proxmox installation will fail.

Disk size, it will depend on each one, as we are going to use Ceph with another disk I will give it only 10 Gb for the OS.

Disk type, I am not going to use it for anything other than the lab, so I leave it in the native VirtualBox.

If we want it to provision the whole (Thick) or on the contrary to grow dynamically (Thin), of course we leave it in dynamic because it is a laboratory, it will take less time and performance gives us a little the same for these tests, whoever wants and has time can tell you fixed will gain a little more performance but it will take longer to create it depending on the size.

Location where to save it and click on create.

Now we have to activate nested in VirtualBox and most of you will find it like this under Configuration/System/Processor

As you can see there is no way we can select this option, it appears in gray, no problem, we open a Linux terminal, those who have Windows will have to open a console with CMD go to the installation directory and launch the following command.
VBoxManage modifyvm PVE1 –nested-hw-virt on
If you have called the machine by another name because you like it better, replace PVE1 by the name you have given it. Now, if we go to the same section, we will see that it is activated.

It is also possible that in this version it says invalid configuration because in screen we have to select VMSVGA instead of VBOXVGA that it gives you by default.

We go to the network interfaces and select adapter 1 as Bridge adapter and select our physical card, this will be for the management of Proxmox from our local network without having to open ports and configurations.

We will activate the second card for communication between hosts as an internal network, it will be isolated.

And finally we will create another network for the vm machines in NAT network mode as if we had a router, so that they have internet (as long as the Promiscuous mode is set to Allow all) but are not at the level of the hypervisors and our network, trying to simulate a scenario as realistic as possible within the possibilities we have

Thus we have 3 networks, simulating a productive scenario:
Management network
Communication network between nodes for high availability, migrations, ceph,…
Virtual machine network
Now we are going to add a 40 GB disk that we will use with ceph to mount a test machine or two, if you want to give it more. To do this we go to storage configuration and in SATA controller the disk symbol with the plus.

Once this is done we are going to install Proxmox on that machine and we are going to work on it the basics to then clone it and not have to do the same on the other two saving time.
To start in configuration/storage we click on the DVD that says empty and on the disk to the right of Ide secondary master, selecting the option select a disk file, we look for our downloaded Proxmox ISO, we accept and start the machine, finding the first screen

The next step is the choice of the disk and file system, we have two options to continue and configure it automatically or click on options and give it our values.

For this lab that we start from scratch we can choose ext4 or xfs for the hypervisor, we will not notice much difference in performance between one and the other as they are small disks and the mv will be lifted in Ceph. Zfs we discard it because you need at least 8GB of memory with ECC if you don’t want to have problems. Never use zfs in combination with a hardware raid because it needs direct disk access and has its own cache. Also in production environments if you use ext4 or xfs use an ADAPTEC controller with BBU and maintenance free cache protection. Proxmox can be made to work with good performance with software raid as we saw in the Proxmox-Performance post but it requires a lot of effort and for the time it will take it deserves a controller.
Regarding the parameters:
hdsize: Defines the total size of the hard drive to be used
swapsize: The default size will be equal to the installed memory for the swap partition up to a maximum of 8 GB. The value cannot be larger than hdsize/8, if set to 0 it will not be created.
maxroot: Defines the maximum size of the root volume, which stores the operating system. The maximum limit of the root volume size is hdsize / 4.
minfree: Defines the amount of free space left in the LVM pve volume group. For disks larger than 128 GB of available storage, the default value will be 16 GB; otherwise, hdsize / 8 will be used. LVM requires free space in the VG for snapshot creation (not required for lvmthin snapshots).
maxvz: Defines the maximum size of the data volume. The actual size of the data volume is:
datasize = hdsize – rootize – swapsize – minfree
As we have a 10GB disk these calculations that Proxmox makes alone, are almost taxes, that is to say, although you put 3 GB root partition will make it of 2.2 GB (hdsize/4) remaining free when installing few MB, but we will make a trick, we will fill only the minfree parameter to 1 to then extend the partition by console and take advantage of the full disk although we do not have LVM snapshots, you can also take a larger disk, this is so that you go seeing little things.
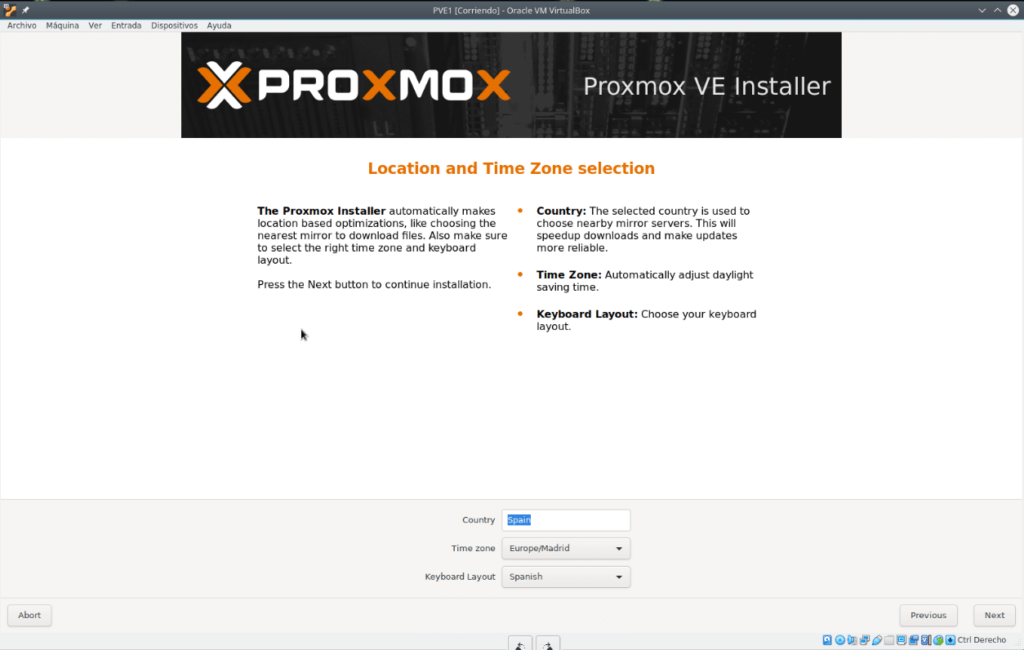
In the next screen we find the selection of Location, time zone and keyboard.
Little to say, we continue, it will ask for user, password and mail.

We continue

We select the first card that is the one that we put in bridge mode and we configure an ip of our network, in the name we are going to put it for this laboratory pve1.local.
The following will be a summary of our installation and we click Install, in a few minutes will be ready indicating that you restart and access the url specified, before giving the reboot eject the ISO in the VirtualBox menu Devices/Optical Drives unchecking the box marked ISO
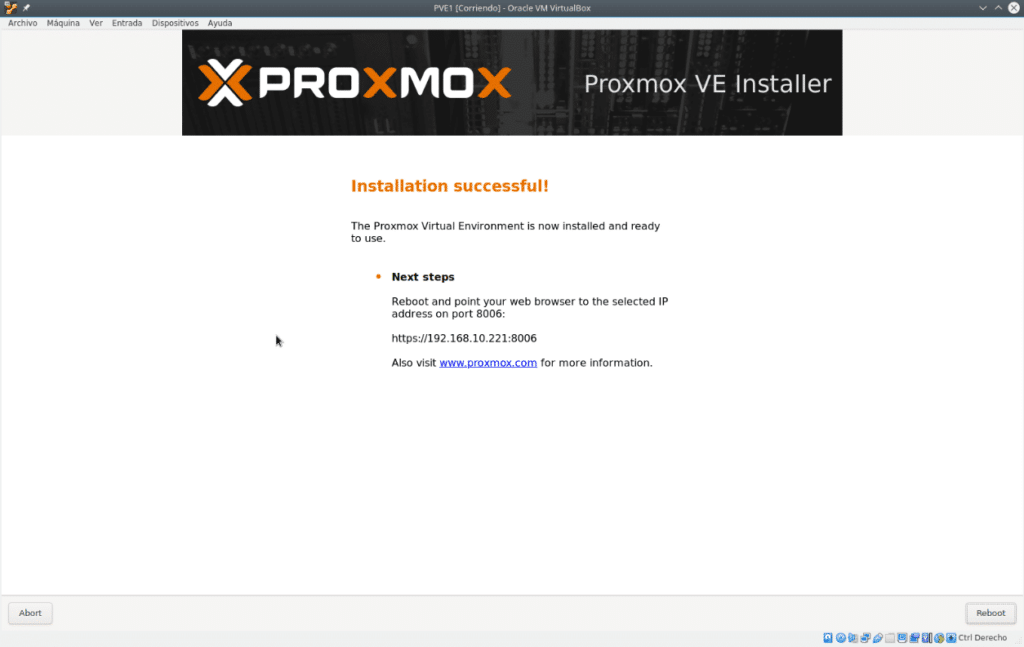
Once restarted we will find

We enter through this console to extend the root partition, we do a df -h and we will see that the root partition is 2.2 GB from there it will not go up even if we put 3 GB in the installation, since it uses the previous rule mentioned above.
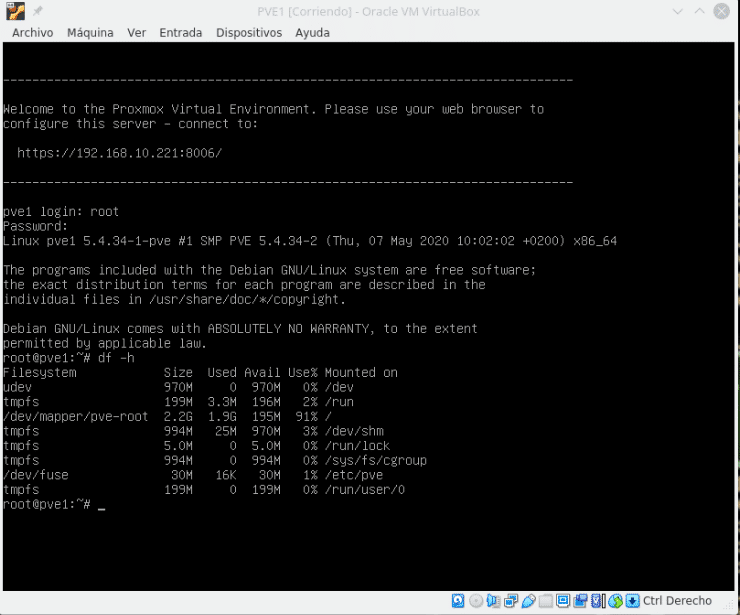
As we start up we see that it has 195M free, as soon as we start to tinker a little it will stay in 50 MB for sure.
Therefore we are going to expand the partition by typing the following
vgdisplay
Where we will see the free GB we put in the installation

To extend it we run
lvextend -L +1G /dev/mapper/pve-root
returning the following

Now we have to resize with
resize2fs /dev/mapper/pve-root
returning the following

If we do df -h we will already see our partition with 3.2 GB with an available space of 1.2 GB.
Now we access the url that tells us the installation or in the console login screen, where of course, will tell us that the certificate is not valid, we accept and we get to the login screen, we enter the username and password entered during installation and we will jump the following

Because Proxmox works on a subscription basis where you get support and access to enterprise repositories. This license is socket based.
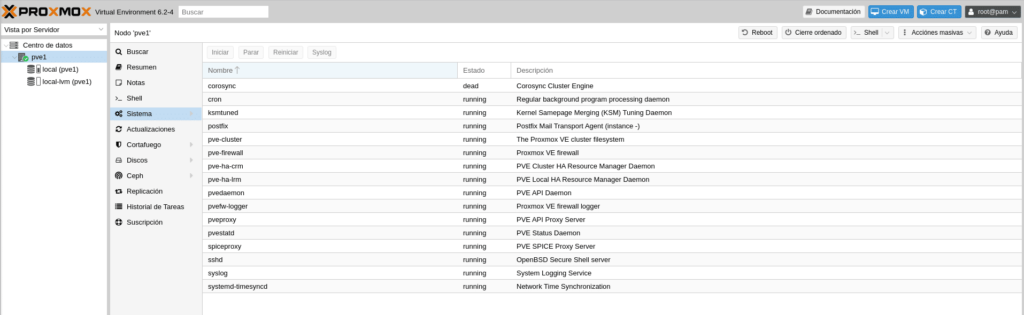
We simply accept and we have our Proxmox. The first thing we will do is to deactivate the enterprise repositories and remove the “No valid subscription” alert, which will pop up every time we log in if we don’t remove it. We go to pve1/Shell or we continue in the previous console. It should be noted that this GUI shell, if you change section it restarts, that is, it is as if you create a new session when you return. For my part I prefer to open an ssh connection if many tasks are to be performed or connect to the virtual machine as we have done so far.

Edit the file /etc/apt/sources.list.d/pve-enterprise.list with your favorite editor, e.g. the simplest one
nano /etc/apt/sources.list.d/pve-enterprise.list
And we add a # to the beginning of the repository that we found, looking like this
![]()
We press ctrl+x and it asks us if we want to save, we say yes.
Now we are going to deactivate the subscription warning, to do this first we are going to make a copy of the file we are going to play by writing
cd /usr/share/javascript/proxmox-widget-toolkit
cp proxmoxlib.js proxmoxlib.js.bak
we edit
nano proxmoxlib.js
Press ctrl+w to search and type Active and you will find the following line of code if (data.status !== ‘Active’) {

for if (false) { resulting in

Now we can check for updates, we can do it by console as in any Linux or by the GUI, we go to pve1/Updates

And we click on refresh which is like doing an apt-get update by console, as we have not restarted services or the machine it will give us the subscription alert this time. When it finishes it will appear all the packages to update and we click above in update system, opening a new window with the console where it launches apt-get dist-upgrade and it asks us if we want to continue, we say “Y”.

When it finishes it will tell us that it is updated, if there was some update that needed a restart it will indicate it to us, it is not the case.
If we click on refresh we will see that there are no more packages to update.
We are going to launch a reboot to verify that everything is correct before cloning the machine, through the interface we place ourselves in pve1 and to the right we give it to Reboot.
And confirm when asked. We enter again to check and the subscription window will no longer pop up. We shut down the machine by going to pve1 and this time we click on Close orderly.
Now we are going to make two clones for pve2 and pve3, in the main VirtualBox window, we right click on the PVE1 machine and select Clone
We will put the name PVE2, the path to store the machine and very important Generate new MAC addresses for all the cards or we will have conflicts when turning them on at the same time. It can also be done from Proxmox but this way we save time which is the most valuable thing.

In the next screen we leave the default to Clone complete.

Repeat the steps for PVE3 and name it PVE3.
We start only PVE2 to change the machine name and ip, since it will have the data from PVE1.
We edit
nano /etc/hostname
and change pve1 to pve2, ctr+x and save.
We edit
nano /etc/hosts
By changing the ip and where it says pve1 we replace it with pve2, remaining as follows

We edit the interfaces
nano /etc/network/interfaces
And we change the ip that you are going to have to be like this

We restart the machine and it would be ready, we do the same with pve3 as it is logical changing pve1 by pve3 and changing the ip to 192.168.10.223 in this case, each one will have its own.
Now we can turn on all 3 at the same time and there will be no problems. So far the first part of the post Proxmox and Ceph from 0 to 100, we will continue with the creation of the cluster in the second installment. (Already available in Proxmox and Ceph from 0 to 100 Part II)
As always good weekend. If you want to purchase any of the licenses please contact us, we are a Proxmox partner.
TL.