Safer navigation
Before we start we will make a brief summary of what is a proxy server in a simple way and that is understandable for everyone, we could say that it is an intermediate server between two machines through which pass all requests made between two machines A and C being the proxy B to allow, deny, limit, . ..these requests, that is to say, the machine A instead of realizing a request to C, realizes it to B and this one to C and depending on the rules that are defined in the proxy server B will give the answer to A as we indicated allowing its connection, denying it, limiting it,….
There are several types of proxy depending on what we need, where we will not go into detail, we will only clarify that it is that of transparent proxy, simply that the machine that passes through the proxy does not know it, that is, it is transparent because it does not see it or need specific configuration, while a proxy just need to configure the machine to pass through the proxy. The existence of transparent proxies is one reason why we create rules on business computers so that they can not connect to any WiFi when they are outside the company because you never know what may be behind a free WiFi.
Well after this little intro, let’s get started.
To start we go to System/Package Manager/ Available Packages and we type squid in the search engine
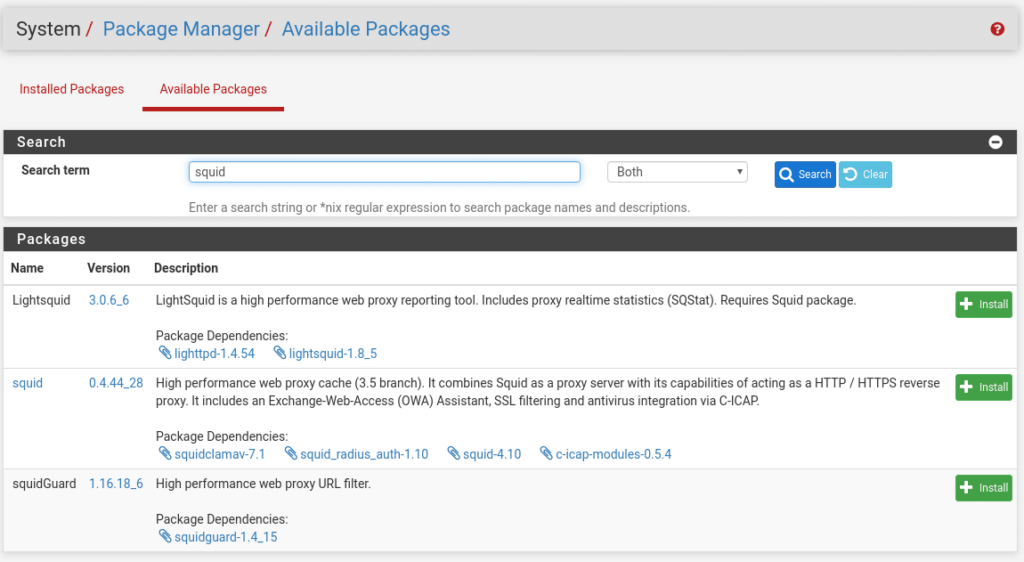
And as we can see, everything we need appears, since Clam-AV will install it when we install the Squid package. As simple as clicking on install and confirm for the three packages.
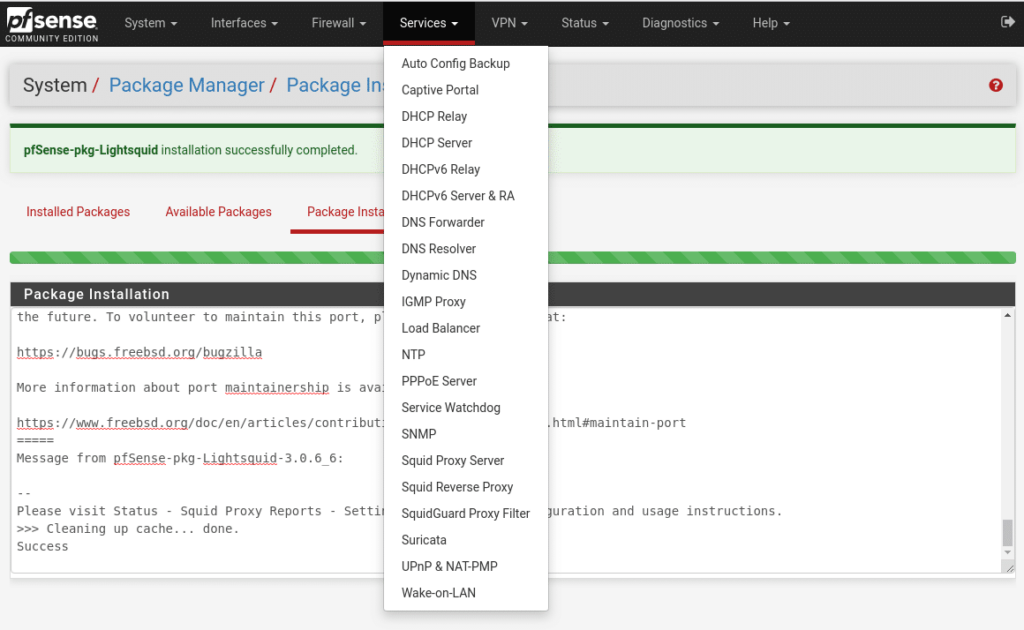
Once installed in the Services menu we will have three new options Squid Proxy Server, Squid Reverse Proxy (which we will not talk about in this post but if you have any doubt write to us) and SquidGuard Proxy Filter. In the Status menu we will have Squid Proxy Reports.
We start by configuring Squid in Services/ Squid Proxy Server/ Local Cache. In the first section we find the general settings

The first is the policy where you decide which objects will remain in the cache and which will be replaced, we have four options where we must put the one that best suits our needs, by default is LFUDA where it keeps the most requested objects in cache regardless of their size, to start is very good option.
Low-Water Mark in % the warning index where it starts to release the cache when the swap is at 90%, here if you do not use SSD disks I advise you to put it at 80%.
High-Water Mark in % the critical index where it releases cache more aggressively, like the previous one if you do not use SSD set the mark to 85%.
Do Not Cache, in each line we would put ips or domains that should not be cached.
Enable Offline Mode, this option can make your cache grow too much and I do not see it very useful, maybe in some specific case you can be useful, basically what it would do is for example, you have squid disconnected from the internet, if a client makes a request would serve the last copy of that web that you have in cache, with it disabled you could not access because squid has no way to verify the cached objects.
External Cache Managers, if we use External Cache Managers.
The next section Hard Disk cache settings.
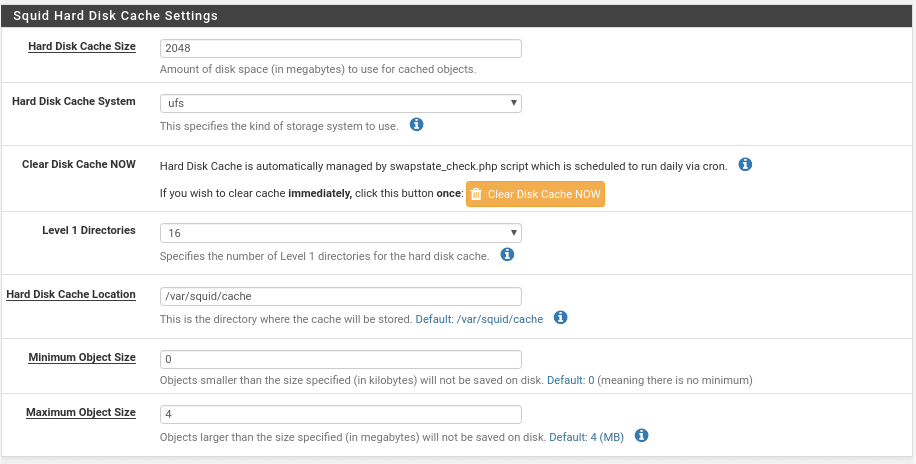
In this section we will define in Hard Disk Cache Size the disk space that we will use for the cache in MB, in this case 2 GB.
The type of cache system, where ufs has always worked correctly for me.
A button to clear the cache manually.
The next value is quite critical for the speed of the cache, here we will specify how many directories Level-1 has, each directory has 256 subdirectories of level 2 if we put 16 would be a total of 4096 directories, a value that I consider good for 2048 MB of cache size for example assuming that each object has 16 KB there will be 2048×1024= 2. 097.152 Kb divided by (16Level1x256Level2x16Kb) would make a total of 32 objects per directory a good value for 2GB of cache, the more cache space this level of objects has to increase. This value must be adjusted when you see the average number of objects you have in cache, the more directories the longer it will take to start the service but it will speed up the cache, although in quotes with a very low cache space you will have problems.
The next option is the directory where it will be stored, followed by the minimum and maximum size of the objects.
Then the next section would be the cache in memory much faster than the disk, where I would not assign more than 25% although in the help it says 50% because it is a parameter that then you forget it is there, you start to install services and you have a problem because you run out of RAM and the firewall starts swapping which already makes everything go pretty bad.
The other two values for most scenarios are correct with 256k and GDSF policy.
And the last section as of today I don’t think anyone is using it.
We have configured the cache first because when configuring the service it will give you errors if it is not defined. With the cache ready we are going to go to the Squid general configuration in the General tab
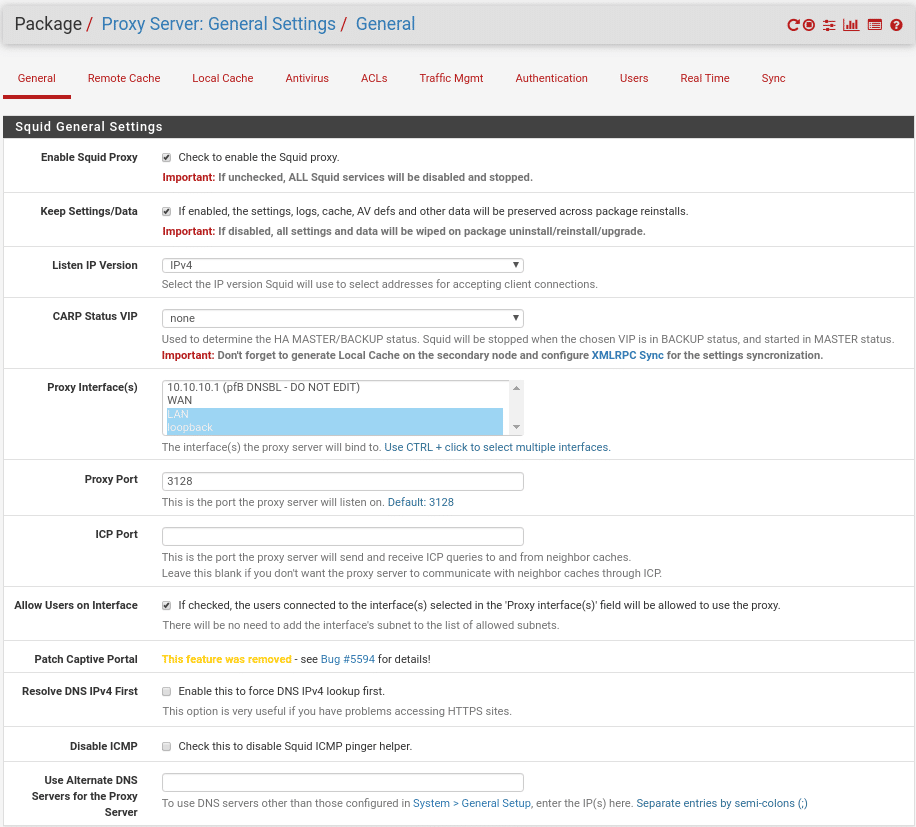
In the General settings section we find the Enable Squid Proxy option that we will have to activate, the Keep Settings option that as in any other package if activated will preserve Squid configurations, logs, cache and antivirus definitions if we uninstall the package.
In which IP version it will listen, select IPV4.
If we use CARP Squid will only work when this firewall is the Master and will stop when it is as Slave in a HA Master/Slave architecture, where it is very important to synchronize the local cache if we use it.
Proxy interface, in which interface we will activate the service, in our case we only have an internal LAN we select it and very important the loopback one because without it we will not be able to activate Lightsquid.
The Proxy Port, the port where squid will listen and to which we must connect, by default in squid is 3128.
ICP Port, we will leave it blank but if we use for example HA or remote caches we will put a port number.
Allow Users on interface, we mark it so that the users connected to this interface can use the proxy.
Resolve DNS IPV4 First, as indicated if you have problems accessing HTTPS content activate it, I have never needed it.
Disable ICMP, to disable ping.
Use Alternate DNS Servers for the Proxy Server, that is to say, to use DNS different from those that we have put in the general configuration of the Firewall.
The next section would be Transparent Proxy Settings
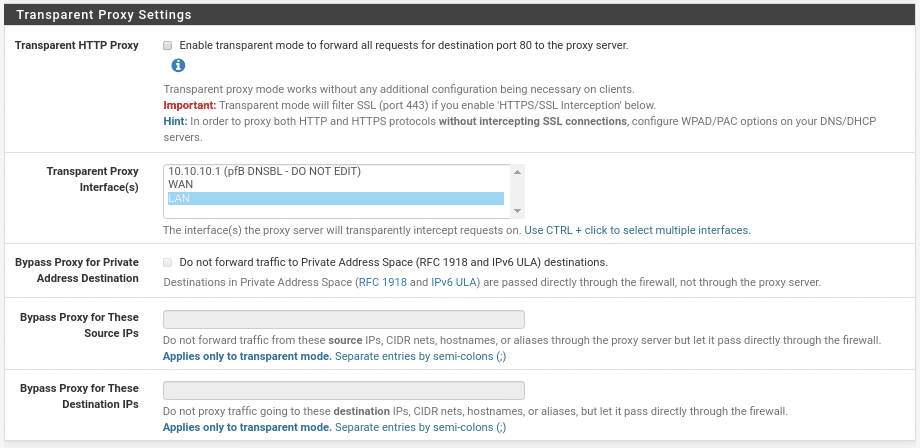
In our case we are not going to activate it but as we explained before it would be for all equipment connected to the interfaces that we select to pass through the proxy without having to configure anything on the machines that are connected and with three options that are very well understood, make a Bypass depending on Private Address Destination, ie, that communication between your internal machines is direct where I advise you to activate it if you want to use transparent proxy. The other 2 options are in function of source or destination adding the ips, networks, host names or aliases separated by semicolon.
The third section of this section is SSL Man In the Middle filtering, very important because nowadays most of the traffic is HTTPS.
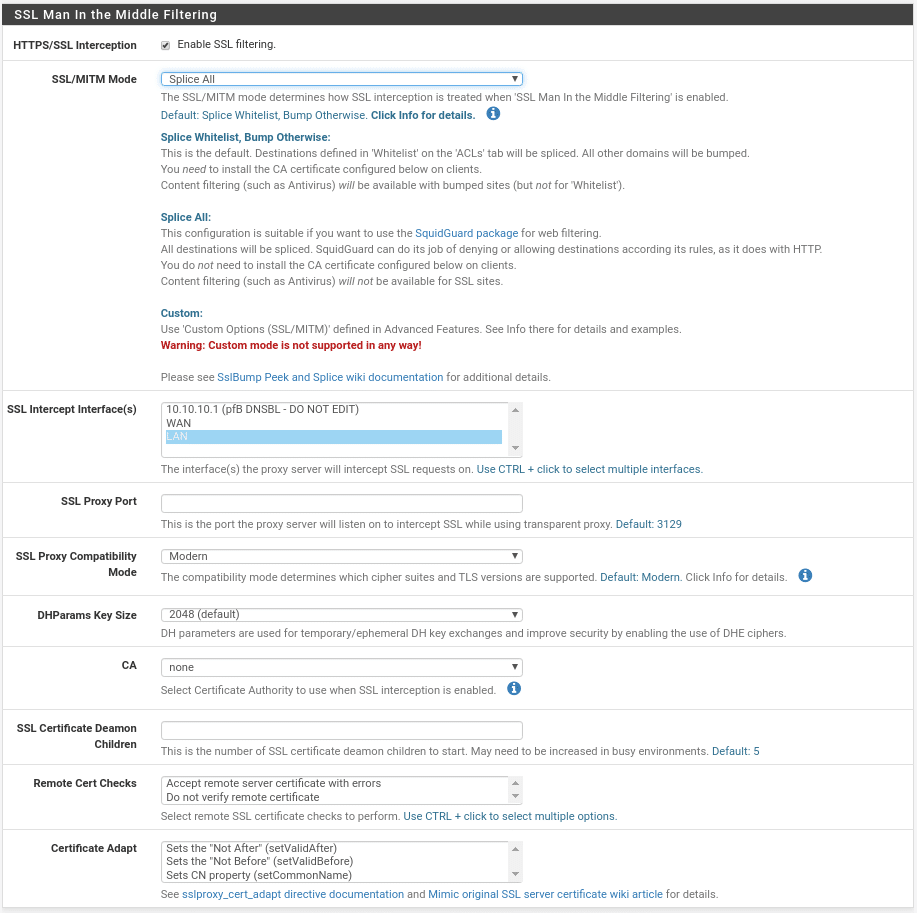
Where we are only interested in HTTPS/SSL Interception have it active, the SSL/MITM Mode Splice All as we are going to use SquidGuard therefore we will not need a CA, any of the other options you will have to create the CA first in System/CertManager and then select in CA the entity created and finally select the interfaces where it will be active, it is possible although it says that it is not necessary that even selecting Splice All tells you that you need to install the CA, if so we install it and select it.
Next section logs

Little to tell, activate them, path where to save them, how many days we want to have the file (blank will be unlimited, this will be configured depending on your needs and resources) and the last one to include in Squid the denied connections that SquidGuard returns us where it will only work if you follow the instructions detailed in click info….
And finally in the section Headers Handling, Language and Other Customizations
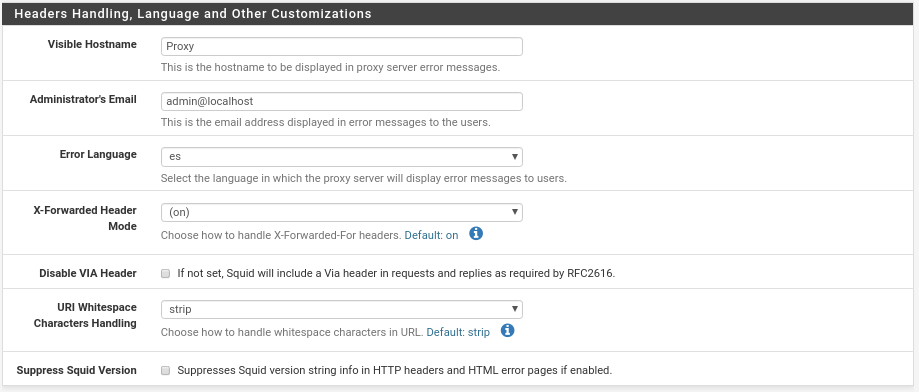
Basically name that will appear in case of an error, the email address of the admin that users will see, the language and settings on the headers that except for special cases as it is would be correct for most scenarios unless there are pages that do not allow proxy, in that case, we put the X-Forwarder on off and check the box Suppress Squid Version.
We move on to the Antivirus section
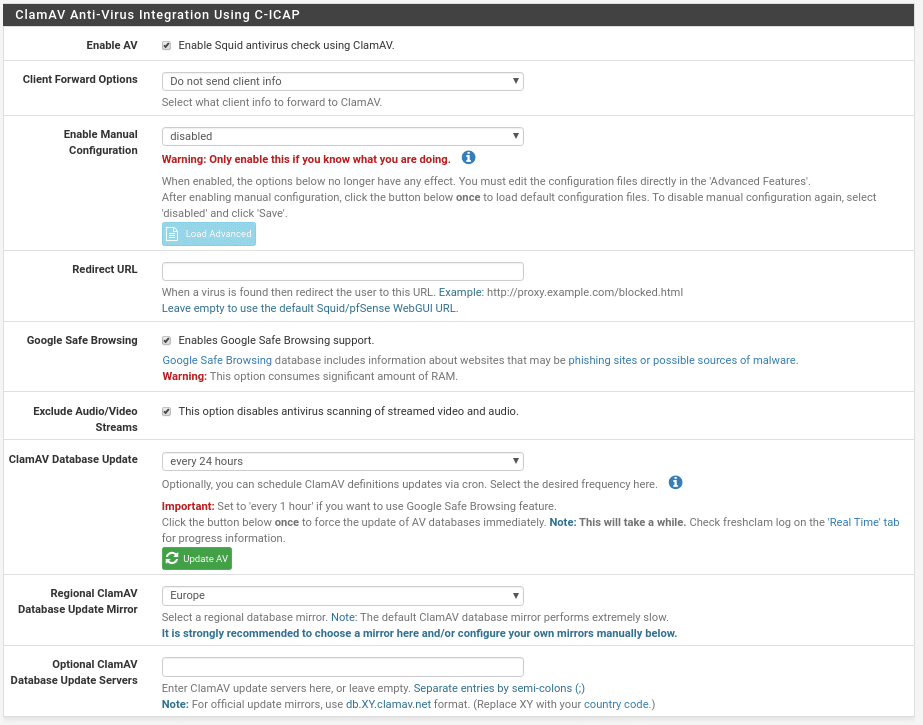
Where we find the first option to enable or not ClamAV
What data we send from the client to ClamAV to taste of the consumer.
To activate manual mode, why complicate the life in this.
URL where to redirect when it has been blocked by virus very useful to educate the users in the navigation.
Use Google Safe Browsing
If you want to exclude audio and video in Streams from the scans, for performance I would exclude them.
How often we want to update the ClamAV database and a button to do it manually.
The region from where to update and finally alternative database servers.
Let’s move on to the ACLs section, where the first section is simple to understand.
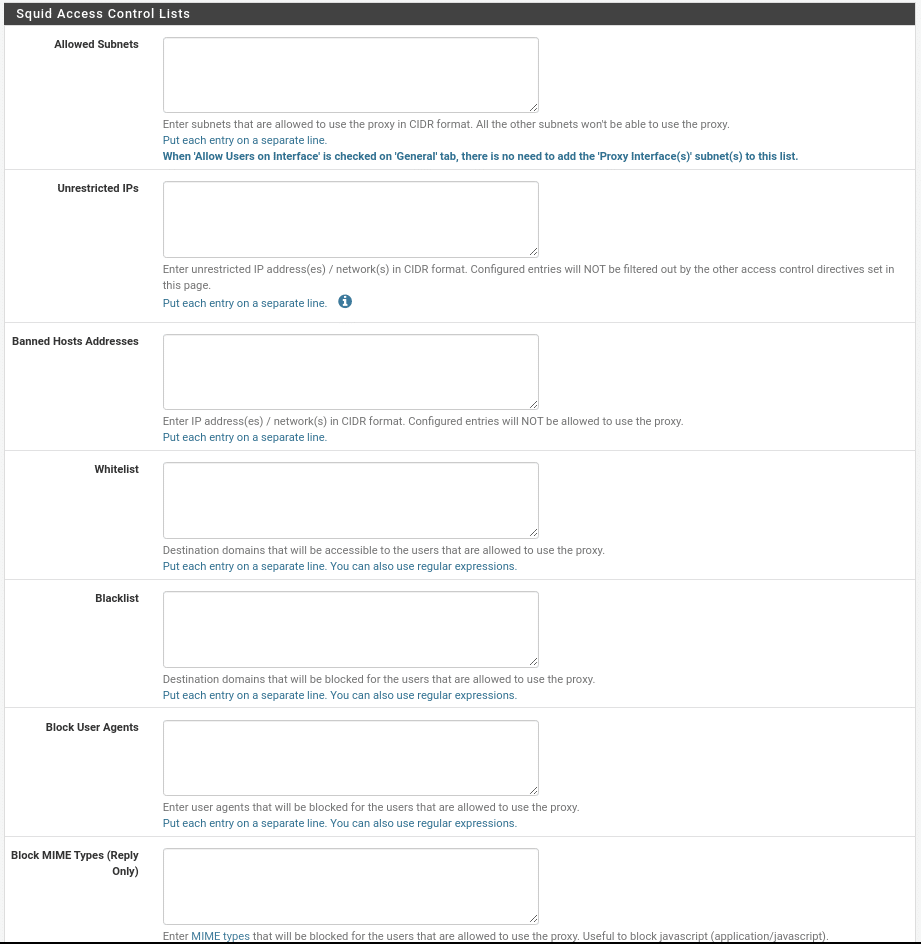
In allowed Subnets we introduce the subnets that will be able to use the proxy, in our case as we activated Allow Users on Interfaces” in the General section we do not need to add any.
Unrestricted IPS, we will add the networks or ips that will not be filtered.
Banned Hosts Addresses, the subnets or ips that will not be allowed to use the proxy.
Whitelist, the white list of target domains that will always be accessible to users.
Blacklist, the opposite of those that will never be accessible.
Block User Agent, to block certain browsers.
Block MIME Types, to block MIME types such as (application/javascript).
And finally in this section the allowed ports

Very useful when for example in SSL we use a different port to those indicated by default (443, 563). Example very used in SSL 8443.
Next section Traffic Mgmt
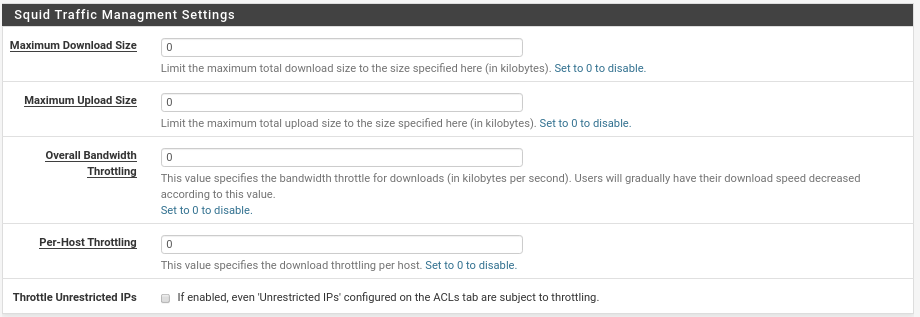
In this first section the maximum download and upload size will not be used much, I have seen some cases where it is required by company policy but it will be 0.01%.
The Overall Bandwidth will decrease the download bandwidth when the bandwidth usage reaches the specified value.
Per-Host Throttling, the same but per host, if a host reaches the specified speed its download will decrease in speed.
And the last option if we want that within these Throttling limits we include the Unrestricted of the ACLs.
Squid Transfer Extensions Settings Section

If we want only some specific extensions we must activate the first checkbox which will activate the following ones that we are not going to explain because it is very clear.
And finally in this section Squid Transfer Abort Settings
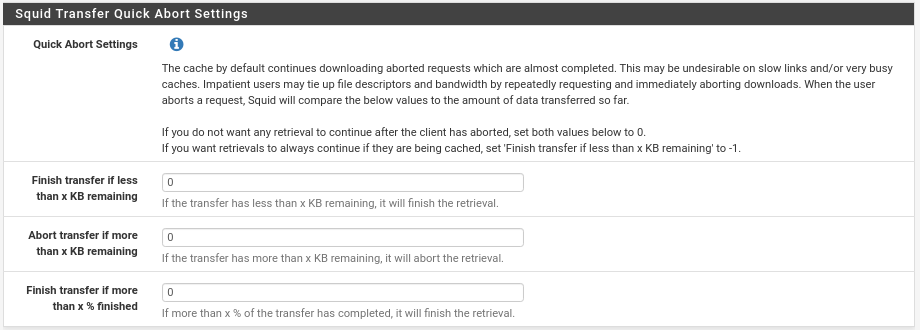
This option has its crumb in each scenario, I recommend you to leave everything to 0 because the users are currently used to that everything goes very fast and if we activate the limitations of Throttling to a very low bandwidth, they will cancel the download, they will give it again, to resume and so several times, the cache by default will continue downloading the canceled requests, if a user cancels it 5 times then 5 downloads if we do not set this value to 0. On the other hand we can also tell it to continue the downloads from the cache if there are less than x Kb left. It is an option that, as I say, has its importance depending on the scenario.
Let’s move on to the Authentication section. In all proxy of companies or clients we must have an authentication system to allow us to create rules depending on the type of user, because they are going to require it. With squid we have four methods, local users that would be added in the section Users, Active Directoruy, Radius or Captive Portal, in this section the options will be activated according to the chosen method, let’s select Local to not take much more time.
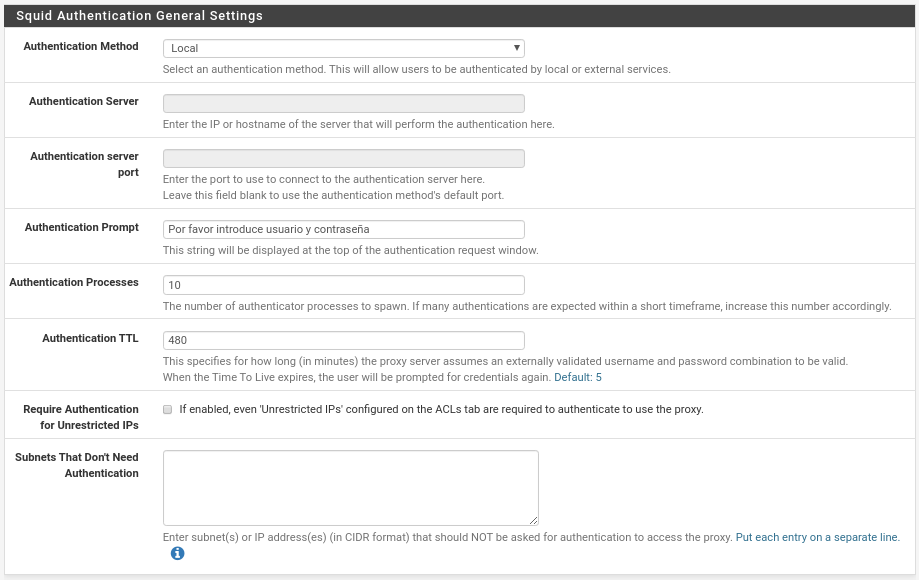
Donde se nos activa 5 opciones, la primera Authentication Prompt donde pondremos lo que verán los usuarios en la ventana que les saltará como por ejemplo “Por favor introduce tu usuario y contraseña”
El número de procesos para autenticar, si tenemos muchos usuarios y todos entran de golpe aumentarlo porque se quejarán en función de vuestro hardware.
El tiempo tras el cual un Autenticación TTL será válida, al gusto de consumidor, hemos puesto 8 horas.
Si le requerimos autenticación a los Unrestricted IPs que tengamos en las ACLs y si queremos evitar que se tengan que autenticar ciertas ips o subredes.
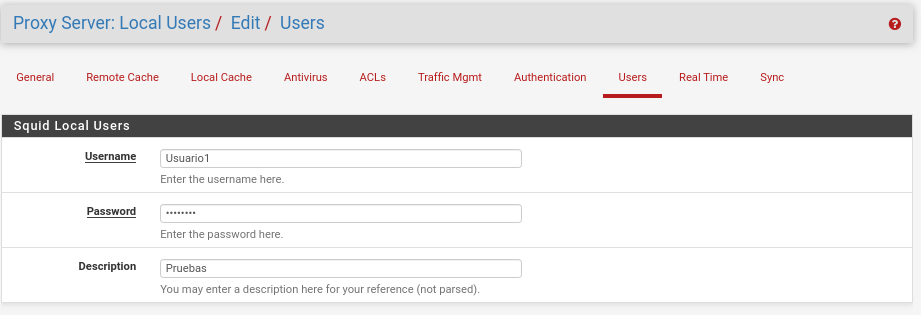
Ya nos queda menos de la parte Squid jejeje. Ahora en Users como hemos seleccionado Local vamos a introducir alguno haciendo click en Add y luego en Save
In Real Time, as its name indicates, we will see what is happening through Squid in real time, differentiated in several sections such as the cache table, SquidGuard, Virus…..
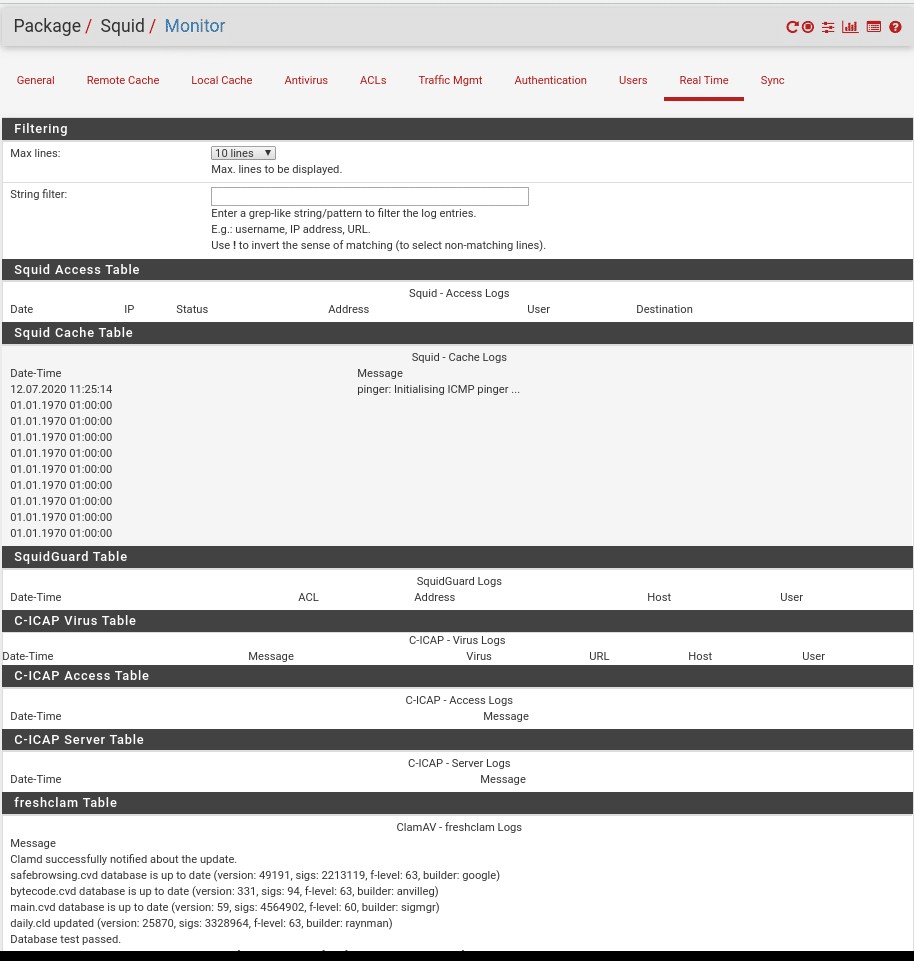
And at the top right the first icon restart service, second stop service, third general configuration, fourth status of services and fifth where we are.
And finally if we use a HA scenario the Synchronization very important to configure.
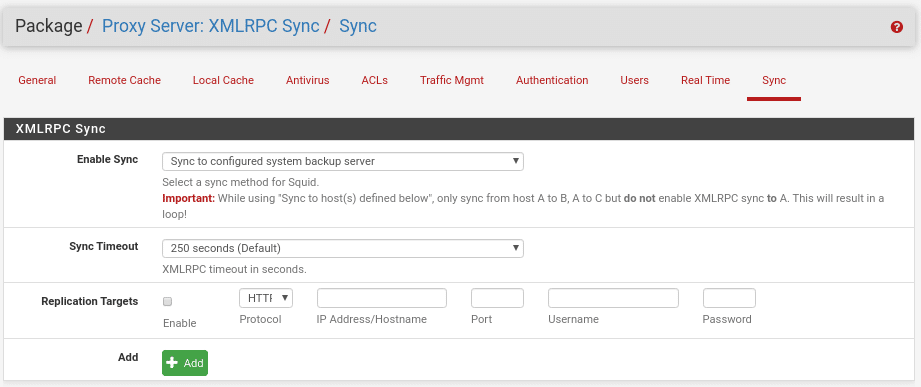
where we will choose the type, how often and the address of the servers to synchronize.
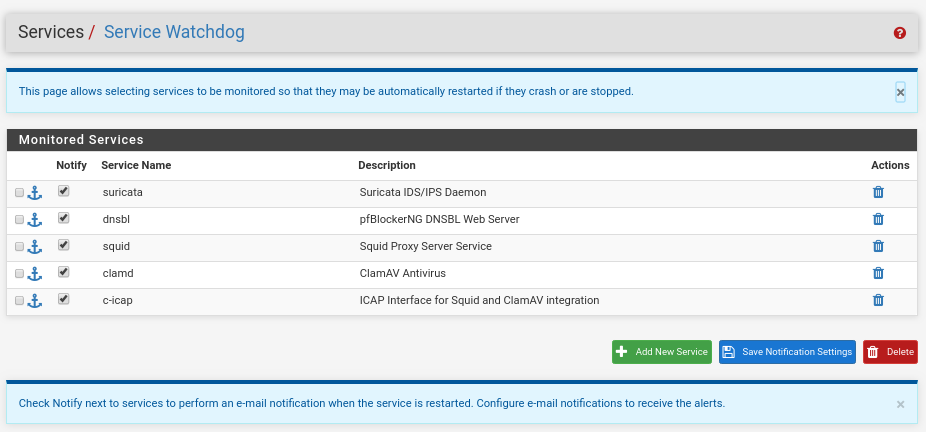
And to finish this first part as in any service that we raise in pfSense and we want to be always raised we go to Service/Service Watchdog and add the service Squid Proxy Server, ClamAV Antivirus, ICAP Interface for Squid and ClamAV, being as follows after our different posts in this same pfsense.
I hope you liked this first part, it won’t take long to make the second one. Have a nice day and enjoy it. (Second part made by clicking here)
TL.