HA cluster creation in Proxmox
We continue with Proxmox and Ceph from 0 to 100 part II. In this second part we will create our cluster.
Comment that everything done by the GUI, can be done by the console, for those who are interested in deepening. In these posts we focus on the GUI as it is obvious since it is from scratch, but as we indicated in the first part, do not stay only with the GUI if you are going to use it in production.
To begin with, we need to define the network through which the nodes will communicate, so in VirtualBox we add the second card as the internal network, which we will use.
To start, we enter node one, click on pve1 and in the menu we go to system/network.

As we can see we have a Linux Bridge with the associated enp0s3 interface and the ip of our Proxmox, which was created in the installation, now we have to use the enp0s8 interface which is our second card, which will be dedicated for HA and CEPH. We place ourselves on the enp0s8 interface and click on edit.

In the window that we find, we need to fill in for this case an IPv4 with the mask, it is to the consumer’s taste, for a laboratory we will put for PVE1 the 10.0.0.0.221/24, PVE2 10.0.0.222/24 and PVE3 10.0.0.223/24. Corosync has a limit of 32 nodes, therefore we have enough IPs with a /24, in production we can put /27 if we are going to reach 32 nodes, in this case with the ips that we have selected we could not because the 10.0.0. 223 of the PVE3 would be the broadcast with a /27, we would have to select, for example, the 220, 221 and 222. Well I do not roll up more about networks, now add a comment to know what role has that network, in this case “Network HA and CEPH” and very important to check the box Automatic start.
Once we click on accept, we will see the following at the bottom of the screen
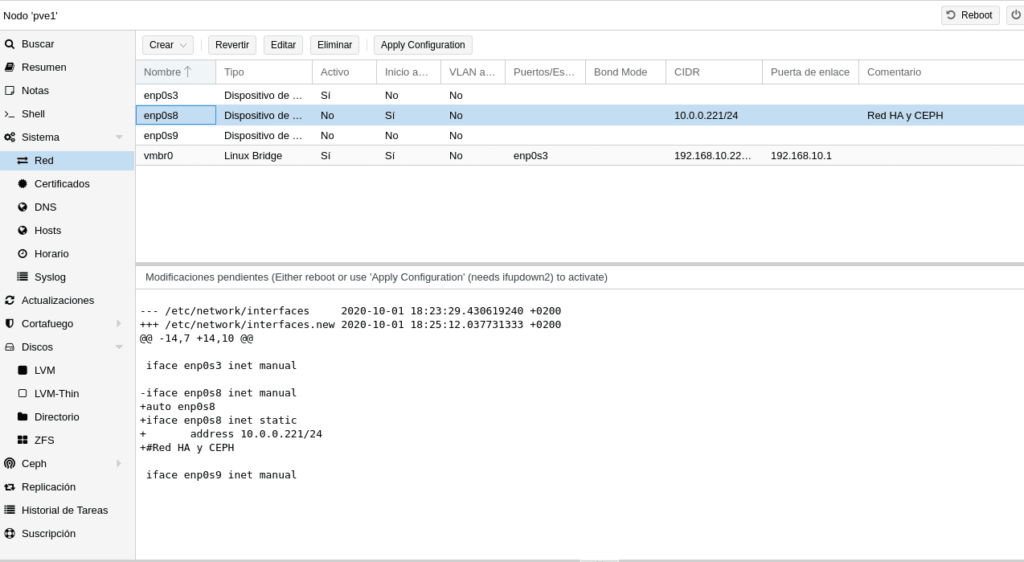
Where it tells us that there are pending modifications and what they are, to apply them restart or use ifupdown2, in previous versions it only told you to restart, ifupdown2 is new in this version and in the gui appears an Apply Configuration at the top right, which does not appear in previous versions. If you give it it will ask you if you want to apply the changes and when you give it to Yes you will get.

And this is because it is not installed by default, possibly because it does not work with OVS interfaces. To install it is as simple as going to the console and typing the following as long as you have a subscription.
apt install ifupdown2
As it is not the case, we can use the repositories without subscription where Proxmox already warns you not to use them in production since they are not 100% tested, for them we edit
nano /etc/apt/sources.list
And we add the repository
deb http://download.proxmox.com/debian/pve buster pve-no-subscription
Staying as follows

We update as explained in the previous chapter but we do not install anything, we just go to the console and write the above mentioned
apt install ifupdown2
We return to edit the sources.list and comment the repository that we have put with a # in front, we will uncomment it when something that we need is only in the testing ones knowing what it entails.
Note that this will uninstall ifupdown, if you are coming from an outdated version of Proxmox you need to check that ifupdown is up to date or at least above 0.8.35+pve1 or the network will stop completely, by typing in the console ifup –version,
Now the Apply Configuration button will work perfectly and we do not need to restart the node. We could have done this in part I before cloning, but this new functionality deserved to be in part II where we start playing networks to get the hang of it.
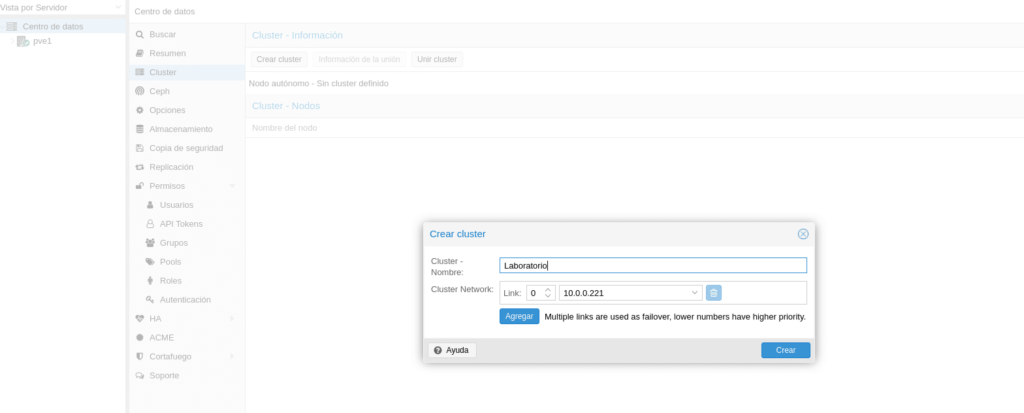
Now we have the HA and CEPH interface configured, click on Data Center and then on Cluster/Create Cluster.
And surprise for those who know previous versions, they have added Multiple links up to a maximum of 8 for the cluster, until now we had to create a bond of cards and use this bond, in this new version we could have another dedicated interface for HA and CEPH without having to make a bond of cards, although this depends on the scenario, since with a bond of cards will work simultaneously, while by links will be used by priority, having higher priority the lowest number, ie, imagine that we put as backup the management would be as follows
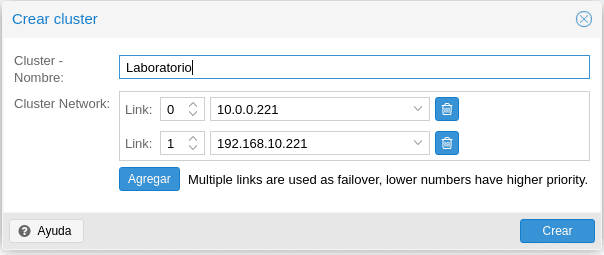
Easy eh? This is an example, do not do it in production, in production use 2 dedicated cards.
We click on create with our HA and CEPH network card and we will see the following in the cluster section

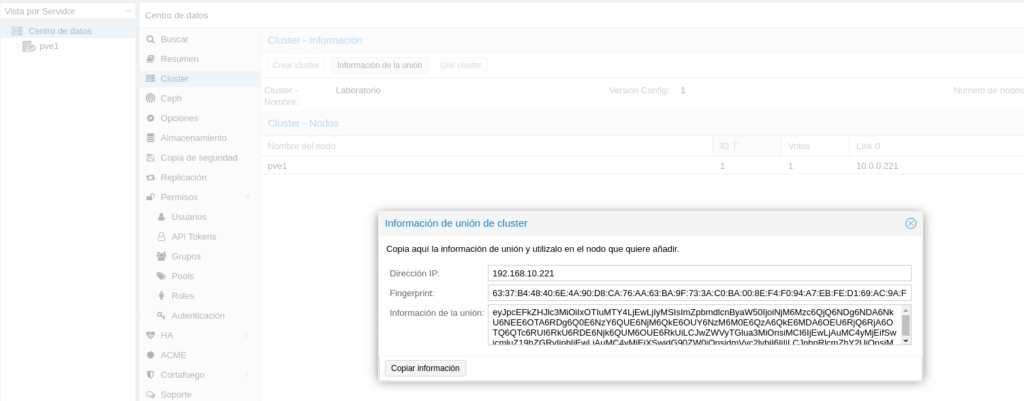
As we can see it gives us the data of our cluster and above a button that puts information of the union, which we will need to join our nodes PVE2 and PVE3, if we had selected more cards we would have the information of the other links with their IP.
Perfect, we have configured our PVE1 and created the cluster, now we configure the network of our PVE2 as we have done with PVE1 and the only difference is that when we are in the cluster section, instead of clicking on the Create cluster button we will click on Join Cluster, and the following will appear.

This information is what we obtain if we click on the PVE1 in the “Union information” button mentioned above.
Click on Copy information and go to the PVE2 node to paste it.
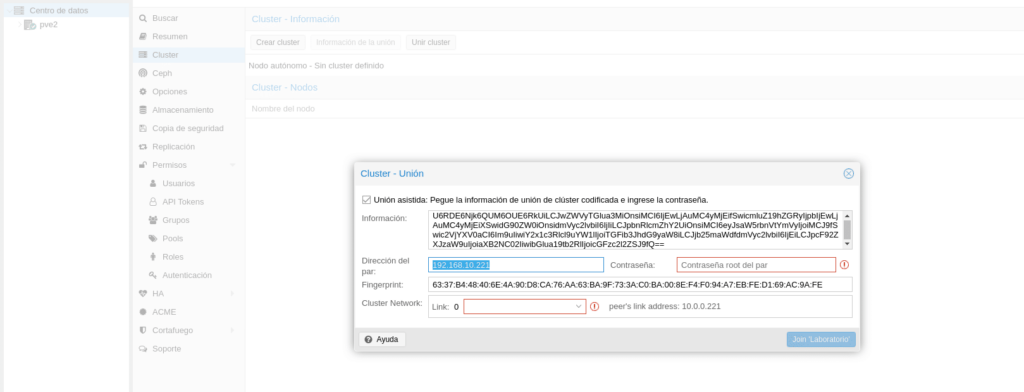
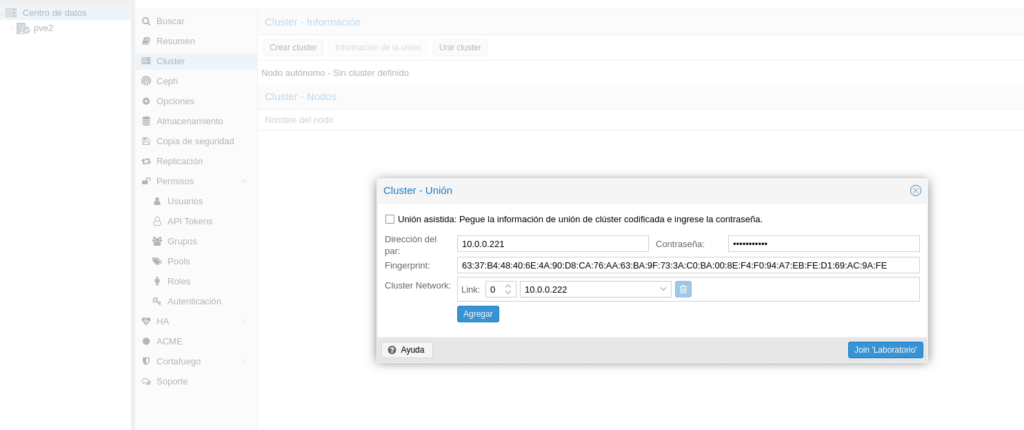
As you can see I have selected to highlight the address of the pair, which takes the management ip of the PVE1 node and we cannot modify it, we want everything related to the cluster to go through the HA interface, well, to be able to modify this ip we uncheck the option Union assisted, we fill in the data with the IP 10.0.0.221 of the PVE1 node and select the Link that we will use, being as follows
And we click on the Join button ‘cluster name’ and it will return the following where a connection error is observed in the background, it is normal because we would have to refresh the gui and re-enter user and pass, we can access the cluster from any of the nodes.

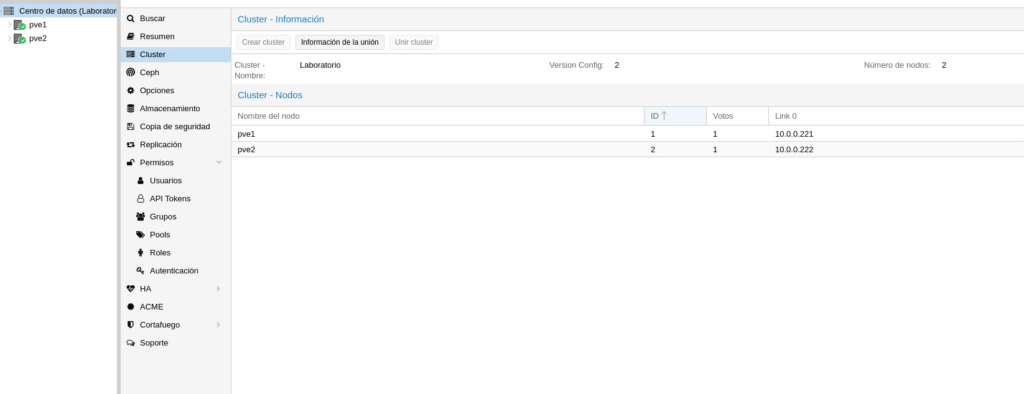
If we enter any of them and go to the cluster section we can see that we have 2 nodes in the cluster.
We repeat the process with the PV3 node and our cluster will look like this

As you can see it has not been complicated at all and the laptop is holding up for the moment 🙂 with the 3 nodes, I hope you liked this second part and that you enjoy it… If you want to purchase any of the licenses please contact us, we are a Proxmox partner.
Available Proxmox and Ceph from 0 to 100 part III
TL.