VM and Container Creation in HA
In this post “Proxmox and Ceph from 0 to 100 part IV”, we will see how to create a virtual machine and a container in high availability.
Each type of storage will allow some features or others, if we go to our cluster in the storage section we will see which ones we have available and for what purpose.

As we can see we have our Pool1 that allows us Disk image and containers, local VZdump backup files, ISO image, Container templates and local-lvm Disk image and container. Depending on the type of storage, if we click on edit it will allow us to select one end or several for the storage. For example the local

It allows us to use it for any purpose, while Pool1 and LVM-thin will only allow us Disk Image and Container.
Therefore to be able to store an ISO we only have the local one, where the local storage in this lab is not very big and a Windows ISO for example would not fit, for that we would need to add another type of storage that allows us bigger. In this lab we will download an ISO in PVE1 and a Template in PVE2.
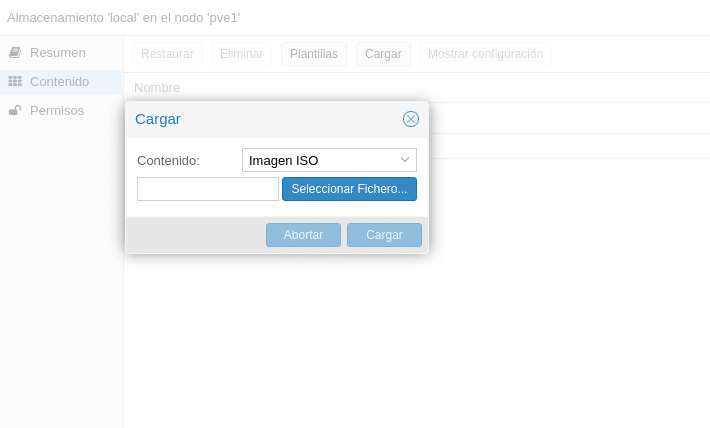
To load the ISO we have 2 options, by the gui or connect to the console and use for example wget, the latter will generally be the fastest, since our CPD will have more download bandwidth than the upload that we can provide with our line.
By the GUI we will go to our storage and in content we will have 2 options, Templates and Upload, if we click on Upload we will get a drop down to see if we want to upload a template or an ISO Image, we would select the file and click on upload.
This is very simple, but as I indicate, slower and that you do not have to upload it again because it has been cut. The best method is by console, we go to the storage mount point, in this case /var/lib/vz/ and inside it to the template/iso directory, that is,
cd /var/lib/vz/template/iso
Now for example to have the ISO of Debian 10 minimal, we type
wget https://cdimage.debian.org/debian-cd/current/amd64/iso-cd/debian-13.0.0-amd64-netinst.iso
Once finished we will have our ISO in that storage and we will be able to use it to create a machine in the node where we have downloaded the ISO, you would have to make this process in the node where you want to install the machine using local storage, you can also have a node with the ISOS in local and then move the machine when it is finished to another node expelling that ISO of the virtual machine, the most comfortable thing would be a storage for the ISO NFS or CIFS for example, and this way to be able to have them from any node.
Regarding the Templates or Template Upload section, it refers to Container Templates. Proxmox besides putting at your disposal several templates also offers you to download those of Turnkey directly. If we go to the local storage, now of PVE2 since in the one we have the Debian ISO and we do not have much space, if we click on Templates we will see all the templates that we can download.
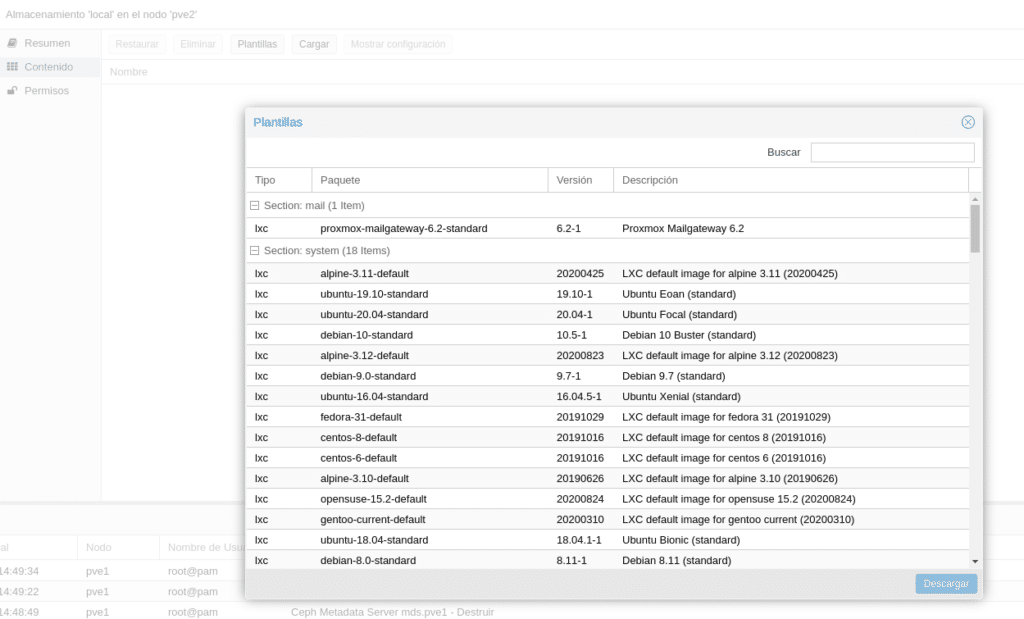
We select the one we want and click on Download. Now we have our ISO and our template to deploy a VM and a TC.
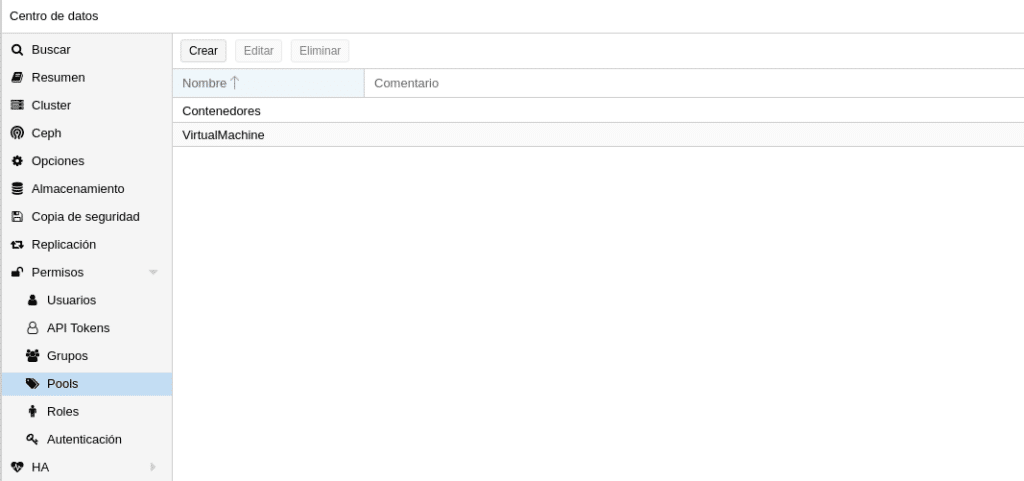
Once we have the ISOs we will go to cluster/Permissions/Pools and we will create a Pool with the name VirtualMachine and another Containers. What is it for? This will allow us to assign VM or TC to a pool in the creation, imagine we have 2, one for VM and another one for TC, then we can create a user that only has permissions on the VM, another one on the TC and another one on both, this gives us flexibility to delegate. It will also allow us to see the resources by groups in the GUI.
The next step would be to create an HA group in Cluster/HA/Groups that we will then assign to the machines and containers, we can define several HA groups, depending on our needs or divisions in the infrastructure. We click on create
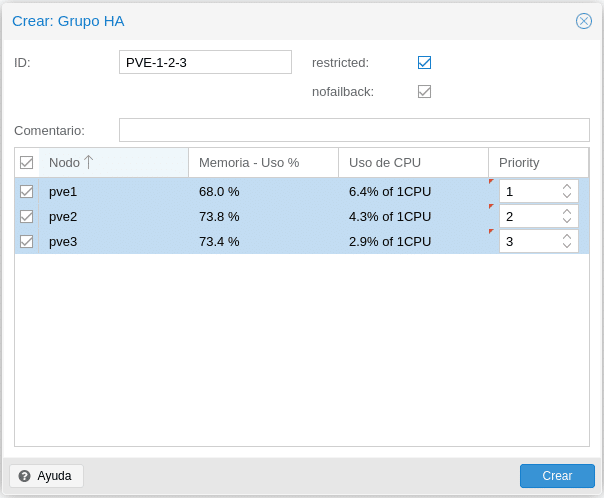
ID we put an identifying name for us.
Restricted, if we check this box the VM or CT associated in this HA group will only be able to start in this group, if all the nodes of the group are down it will not wake up until there is one available. If we leave it unchecked and the nodes of the group are down they will go to another available group until there is an available node of the group to which it belongs and move that machine to its group.
Nofailback activated tries to run services on the node with the highest priority, that is, if a node with higher priority is connected, the service will be migrated to that node.
And finally we have the nodes that we want to assign to the HA group and if we want to give priority or not.
Also if you remember in the first post we installed a third card for the network of the machines which we will proceed to configure. In each node we go to System/Network/Create/Linux Bridge, where we only need to give it a name, check automatic start, which is our physical bridge card and a comment to identify it.
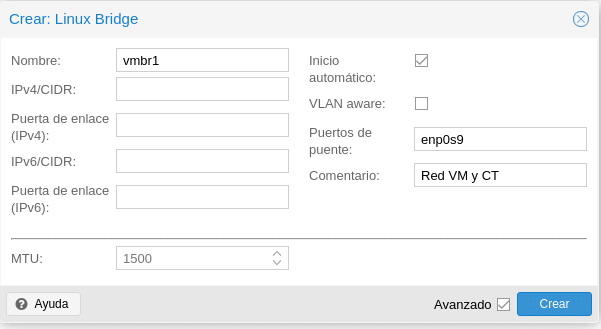
We click on create and as we installed ifupdown2 we can click on Apply Configuration above without the need to restart the nodes.
Let’s move on to create our machine, we click on the top right on the blue button Create VM and we will get the first creation screen
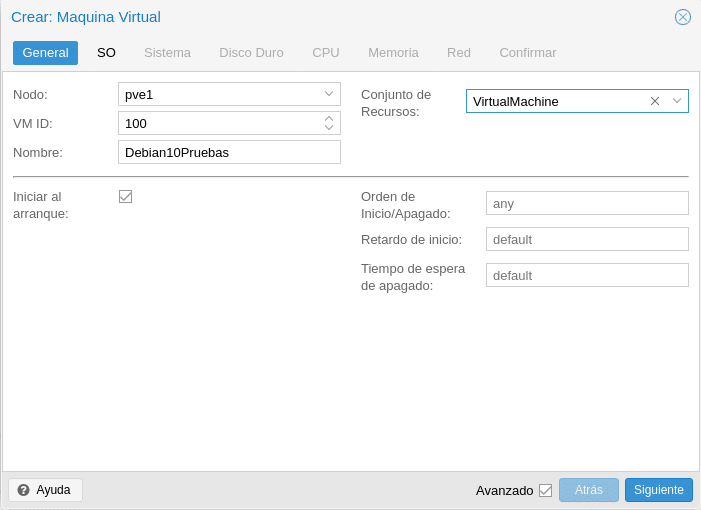
We select the node, the id that we want to give to the machine by default starts at 100, a name and the set of resources where the pools that we created in the permissions part will appear.
We check the Advanced checkbox so that we can see the lower options. If we want or not to start at node startup, if we want to give a Startup/Shutdown order, this is very interesting when we have critical and non-critical machines prioritizing our service. If we prioritize the non-critical ones we put a Startup Delay so that the critical ones have more resources at startup.
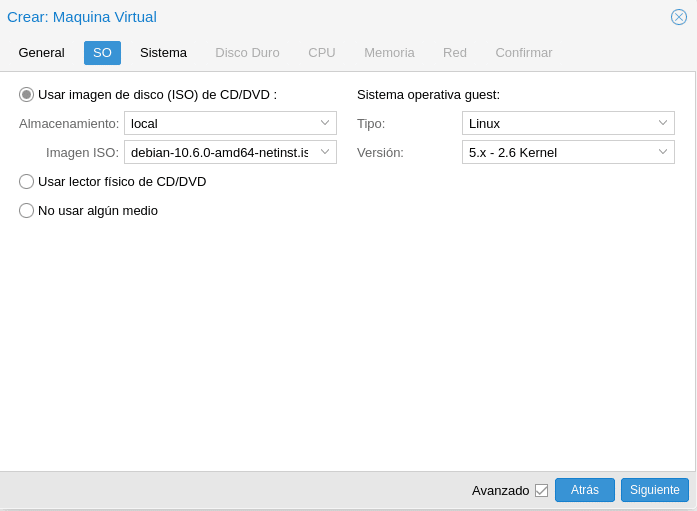
In the next screen we choose the OS, there is not much to explain, it is very intuitive.
We continue and we will have System, this part is quite extensive to explain in a post because it will depend a little of each machine, the only thing we will do is to activate Qemu Agent that will be used to exchange information between the host and the machine, in the help is all very well explained, any doubt comment us and we will help you.

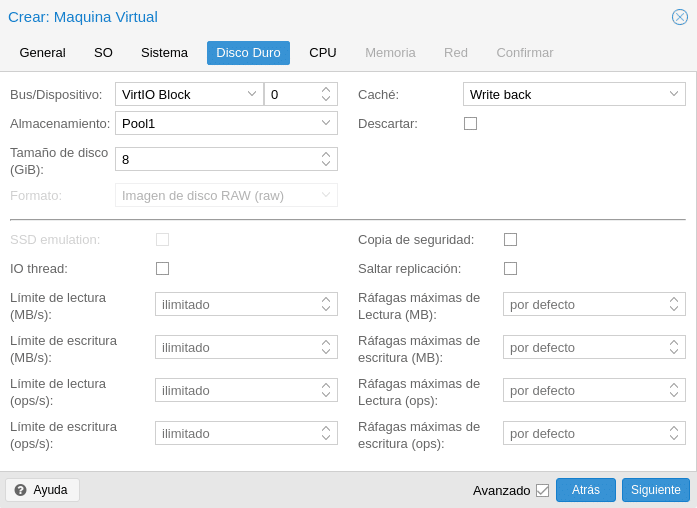
The disk part is also very extensive but if we explain that as a general rule, VirtIO Block with Write back has a very good performance and very important, the format, as you can see in the following image is disabled because it will use RBD Format 2. This allows us for example cloning and snapshot, in file-based storage only the qcow2 format will allow us the snapshot functionality. Important also the Backup checkbox, if it is unchecked as in the image when we create a backup task this disk will not include it, the same with the Replication checkbox but on the contrary, if we check it it will not include it.
Regarding the rest of the options they are quite intuitive but they are also explained in the help.
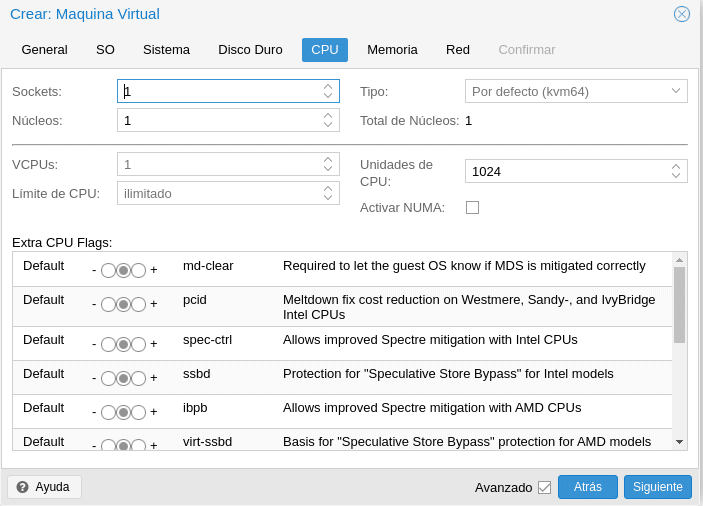
We move to the CPU, where we already have options to bore and everything will depend on our scenario, as I say this look at the help and if you have questions or any problems ask us.
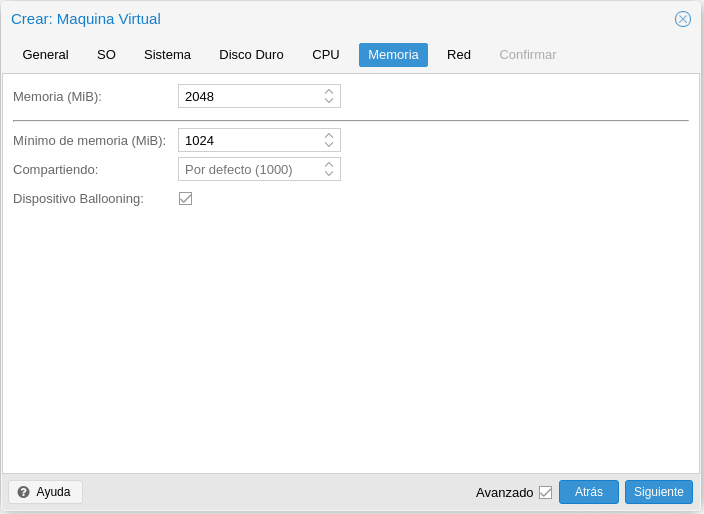
Regarding memory, we have the option to assign a fixed memory or to do Ballooning, this will depend on what we are going to mount. The Sharing check box will allow us to give more priority over other machines if we increase the default value 1000 when we activate Ballooning.
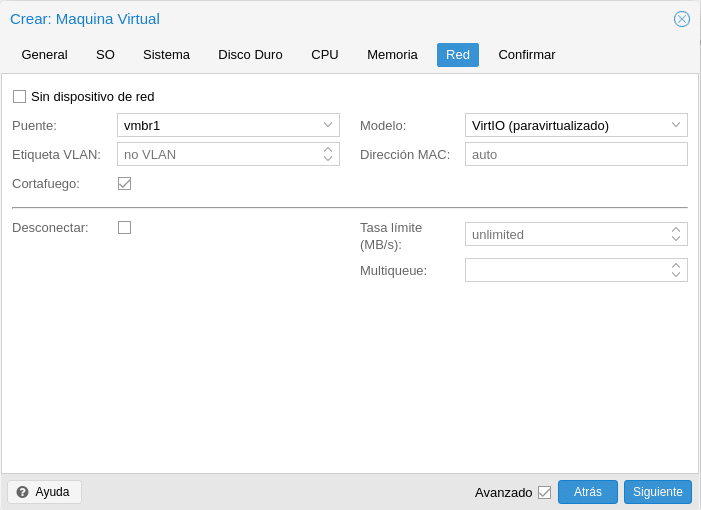
Finally before confirming we must configure the network by selecting our VM network and CT, in this section comment that depending on the system you will need to play with them to get a good performance, as a general rule VirtIO works very well but for example in FreeBSD is problematic.
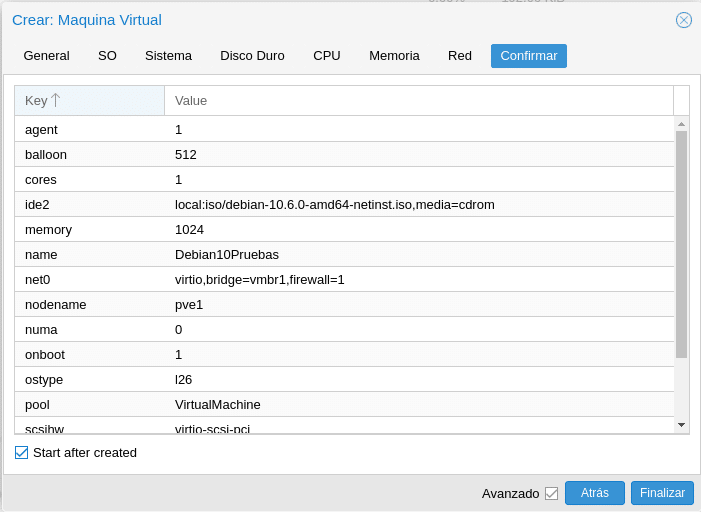
Click on Next, select Start after created and Finish.
Once the machine is booted, we select it, go to console and install the operating system. In this case being a Debian 10 when we finish we will install the qemu agent to be able to have that information exchange between host and virtual machine with:
apt install qemu-guest-agent
systemctl start qemu-guest-agent
In Windows there are more steps to perform, we would download the latest ISO of Windows VirtIO Drivers in our ISO storage. We would mount the ISO in the DVD, look for qemu-ga-x86_64.msi or qemu-ga-i386.msi in the guest-agent directory and install it.
Perfect, we repeat the steps for the TC but with some difference, since we will not have to define hardware when running on the host. We click on the blue button on the top right side Create TC.
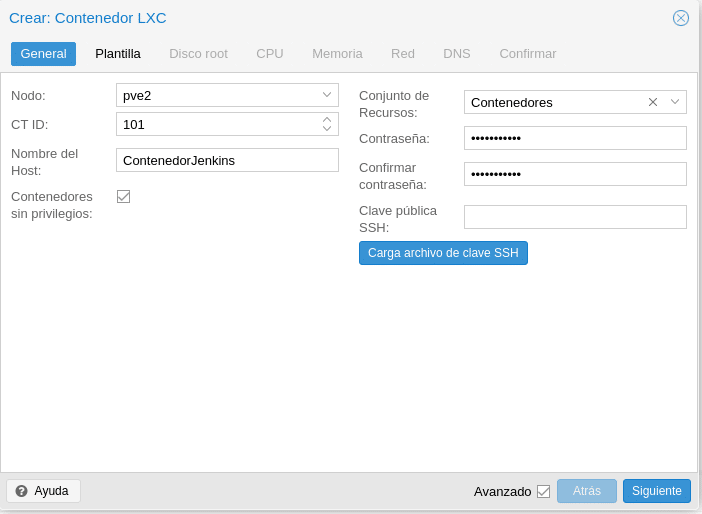
As we can see this first part is a bit different. We have selected PVE2 which is where we have our template stored locally, we have given it an id and name, assigned it to the Containers pool and set our root pass to the container, we can also load an SSH key.
Next in Template we select local and our template, click next, we go to Disk root
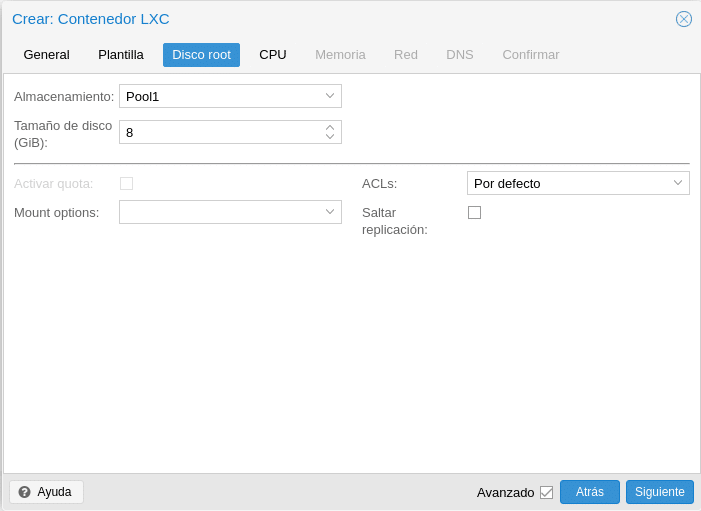
Here we will select the storage and size, mount flags such as noexec to prevent execution of binaries, ACLs which allows us to set a more detailed file ownership than the traditional user / group / other model and skip replication which is the same as in the VMs.
Next would be the CPU where there is not much to explain if you read the documentation when you created the Virtual Machine so we move to the memory where we find the memory and the size of the swap partition where depending on the memory and container type we will assign a size or another below 1 GB always put the same amount of SWAP. As you will observe here there is no Ballooning since the containers unlike the machines do not have reserved memory, that is to say, if we put 4 GB and it is consuming 512MB the rest will be available for the cluster, in the Virtual machines if we put at least 2GB that memory is reserved even if it is not used.
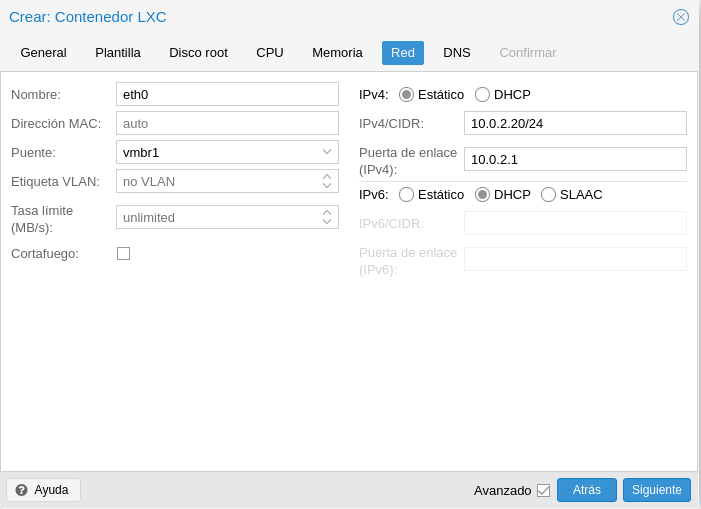
The next step would be the network where we will have to assign our configuration either with fixed or static ips, normally we will use static ips in production. As we are using a virtualbox network I assign an ip of that network. They also have the option of VLAN tagging and limitation.
Finally the DNS if you want to use other than the host’s own and Confirm
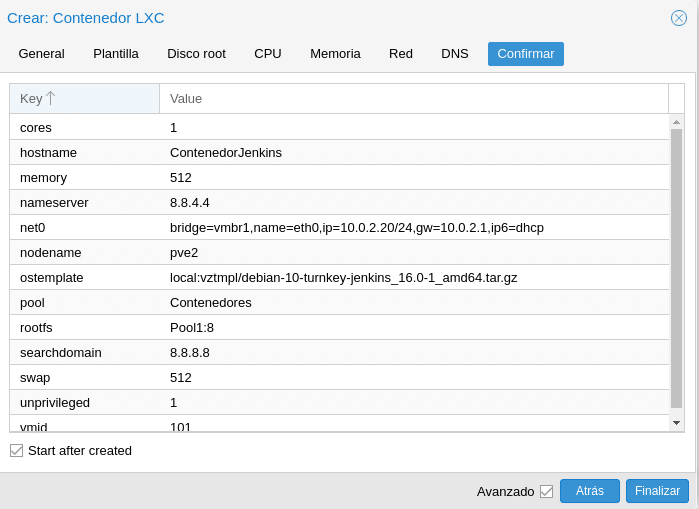
After a few minutes we will have in this case a fully functional Jenkins without installing operating system, nginx, jenkins, only in the first boot you may be asked for some data as in the case of Jenkins that will ask you to put a password for the jenkins-admin, for example. A brutal time saving, although a double-edged sword because then when you want to mount a Jenkins in a virtual machine and you do not remember and all the time you gained with the containers you will spend on raising a Jenkins hahaha, just kidding.
Once we have our machines we need to add it to the HA group that we created earlier, for this we have 2 options, select the machine and on the right in More select Manage high availability.
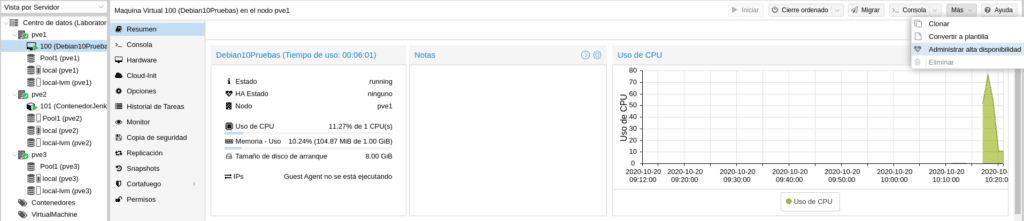
The following screen will appear
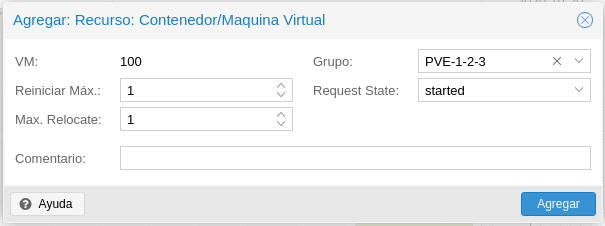
Max Restart is the maximum number of attempts to restart a failed service on the current node.
Max Relocate is the number of attempts to relocate the service to a different node, this will only occur when the Max Restart value is exceeded.
The HA group to which we are going to associate the service, in this case the one we created previously PVE1-2-3.
Finally the Request size where we have the following options.
started: It tries to start the service and it will mark it as started if it is successful or in error if after the established parameters it has not been able to start the service in another node. The latter will happen for example, if we use the Backup, if the fall occurs during the backup HA can not lift the service on another node because it is blocked by the backup, you would have to unlock the machine by console manually with qm unlock id-machine.
stopped: will leave the resource in stopped state but will migrate it to another node.
disabled: it will leave the resource in a stopped state and will not migrate it to another node.
ignored: the resource is removed from the administrator state and all API calls to this resource will be executed without going directly through the HA stack.
So to keep the service up, we select started and click on add.
The other place to add resources in HA would be in Cluster/HA by clicking on Add.
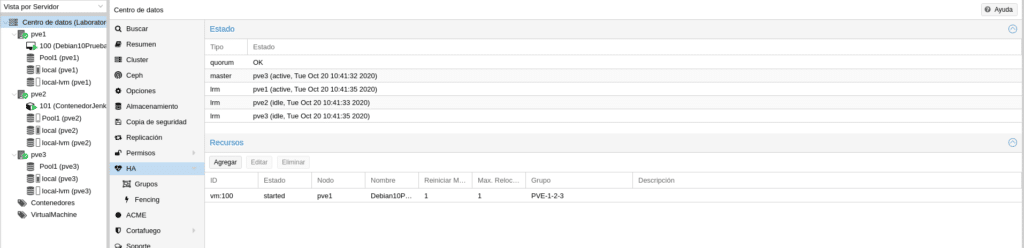
The same configuration window will appear, select our container, configure it and we will have both resources in HA.

In Proxmox we can do HA simulation with pve-ha-simulator, for this we need to uncomment the repository we added pve-no-subscription in /etc/apt/sources.list removing the hash at the beginning in
deb http://download.proxmox.com/debian/pve buster pve-no-subscription
We save and perform
apt update
apt install pve-ha-simulator xauth
Once installed in /root for example we create the hasimulator directory
mkdir hasimulator
In order to execute this command we must redirect the X11, hence we have installed the xauth package, so we connect to the node via ssh with
ssh root@pve1 -Y
(on Windows you can use MobaXterm ) and run
pve-ha-simulator hasimulator/
The following window appears.
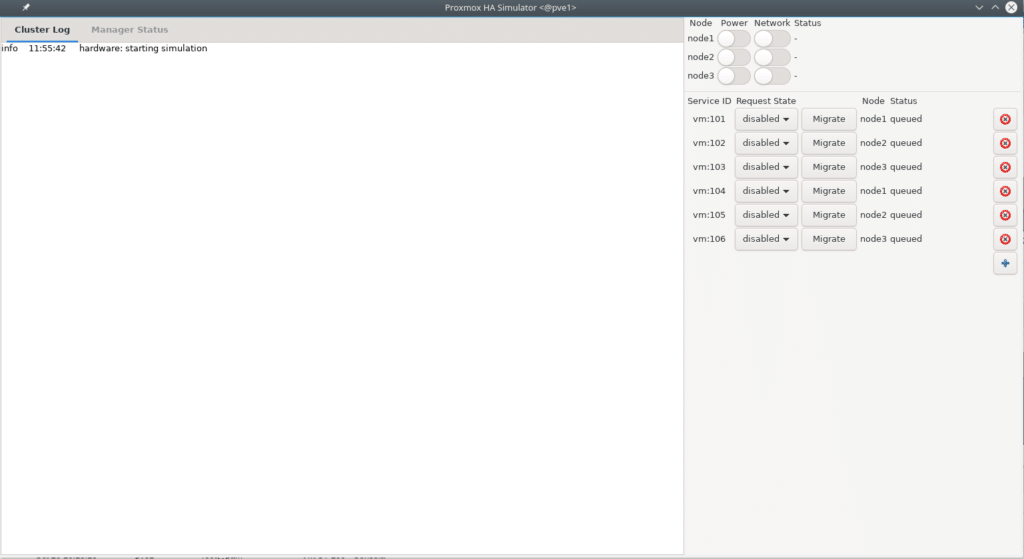
We eliminate the ones with the red X and add our vm and CT, turn on the nodes above and we will have the following look
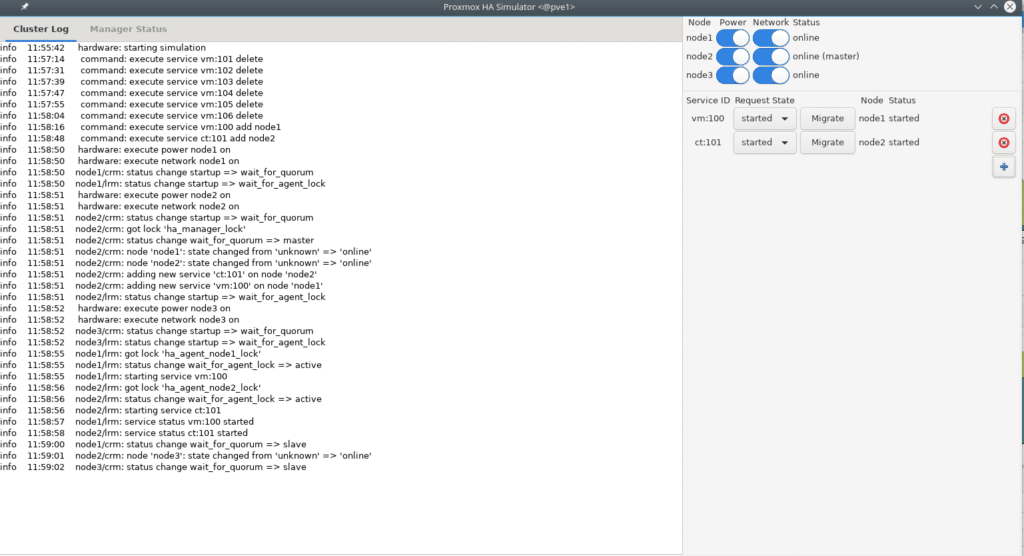
Now we can start testing without fear to check our configuration as this will only simulate not execute any command in Proxmox, for example we turn off node 1 and observe the whole process that would have made our platform to this event.
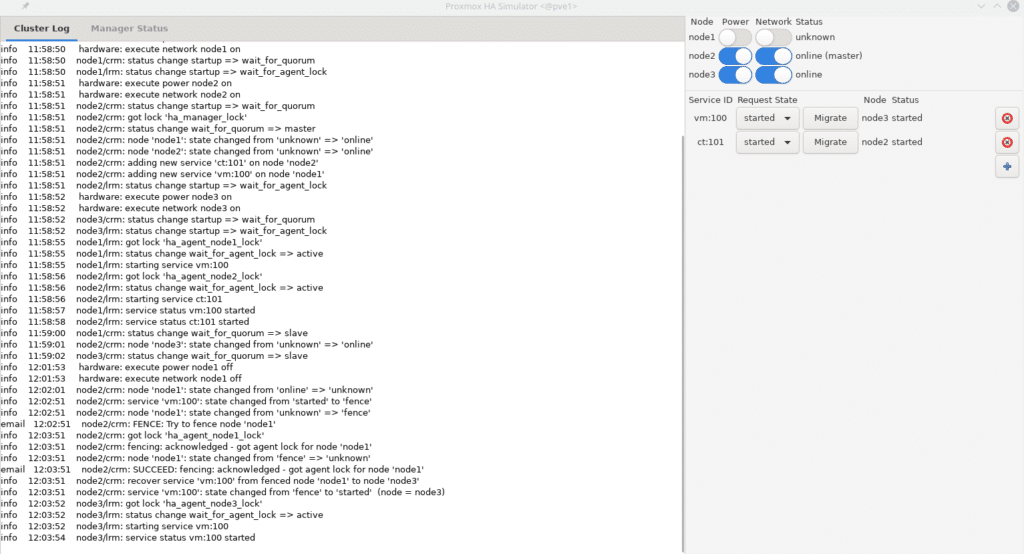
As we can see in the log it tells us everything that has been done before the fall of node 1 migrating the vm with id 100 to node 3. You can do all the simulations you need to see how your cluster would behave according to the configurations.
You can do the same by shutting down one of the virtual machines to see how HA and CEPH behave.
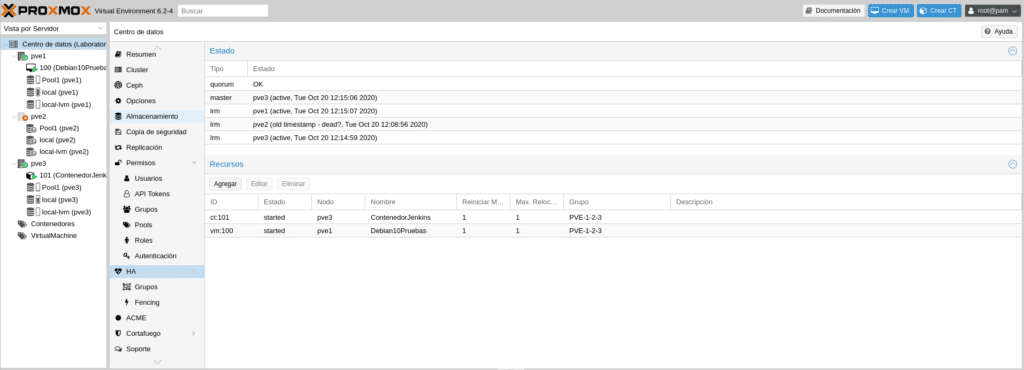
We are going to shut down the vm of the PVE2 node as if it had fallen suddenly, simply in VirtualBox we click on the x of the window and shut down and we will observe in our platform how the CT 101 raises it in another node, in this case in the PVE3.
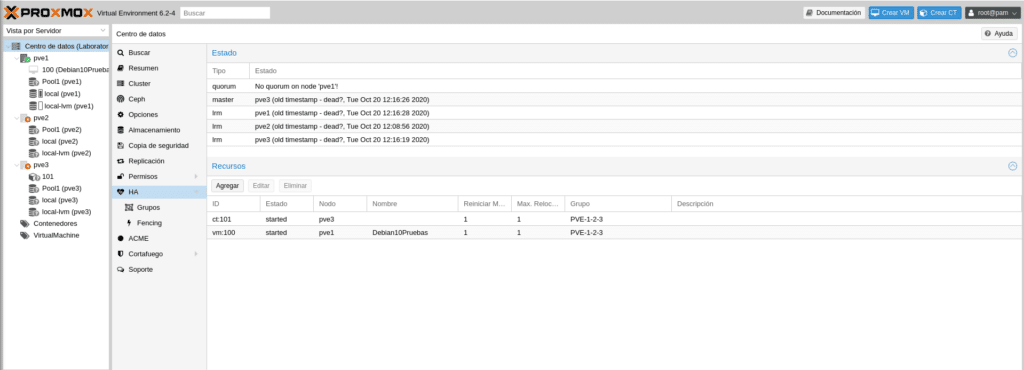
If we now shut down PVE3 we will see that it can no longer do anything because we have lost access to ceph and there is no quorum in PVE1 so we will see all machines shut down and Pool1 with interrogation on all 3 nodes.
If we turn on the other 2 nodes again we will see how everything is recovered automatically without losing any data from the machines since there is only one replica of them and ceph blocks the access, keeping an intact copy of the data and avoiding damage to the only one left. But patience because in this lab with the resources we have it will take a while.
As always a pleasure, we will finish this series of post with Backups and some useful commands of the day to day. If you want to purchase any of the licenses please contact us, we are a Proxmox partner.
TL.